A while ago, I built a Media Centre / Home Theatre PC (HTPC). In my case it’s a small Mini-ITX computer that sits under the TV, whose sole purpose is to play DVDs and other media from our extensive collection. People have been asking me to write up about the hardware and software and how it’s all built, so here is the post about the hardware.
[toc]
Summary
For those who can’t wait, or have already read the rest of this article, here is the hardware:
- Motherboard: Intel Desktop Board DH77DF
- Processor: Intel Core i3-3220T
- Power supply: Mini-Box picoPSU-160-XT plus 192W 12V DC brick
- Case: Jetway JC-110-B
- Storage: Crucial m4 64GB mSATA SSD plus home server
- IR remote receiver: Inteset “Intel CIR Receiver”
- HDMI CEC adaper: Internal HDMI-CEC Adapter or USB version
- Memory: 8GB from Crucial
- DVD drive: optional
Motherboard
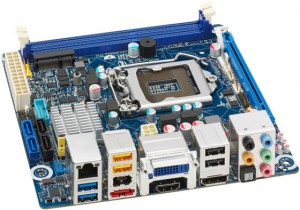 I was after some serious low-power grunt, in order to build a machine that would last me a long time. The Atom+ION combination is nice, but even current media is beginning to tax the CPU there, especially when dealing with deinterlacing. The AMD FX options are also nice but the last batch of reviews I read also complained about a possible lack of CPU, so that leaves me with Intel’s Core i3 offerings.
I chose the Intel Desktop Board DH77DF. This takes any LGA1155 CPU (Core i3, i5 or i7) up to a staggering 95W TDP. Among all the usual USB ports, memory sockets, etc… it also sports native HDMI output, a PCIe x16 socket, a Mini PCI-e / mSATA socket, real Intel ethernet, and some interesting HTPC-specific headers (more on these below). Basically a fully featured desktop board with fewer PCI-e slots, what’s not to like?
Processor
Despite saying I wanted a lot of grunt, one of the main focus points of this build was low power. Intel’s Core i3 CPUs can do low power very well, thankfully, and you don’t have to sacrifice much performance. Low power is important on two fronts:
- The more power you use, the hotter the machine will get. The hotter it gets, the faster your fans will have to run. The faster your fans run, the more noise you create. Ergo, a low-power CPU means a quiet HTPC.
- You have to provide the power to the board somehow. The enclosure I chose certainly can’t fit an ATX power supply, and DC-DC power supplies are almost all fanless. So a low-power CPU also means you’re more likely to be able to power the board properly in the first place.
After reviewing all the options, I went for Intel’s latest Ivy Bridge based Core i3s. The 22nm process means less power/heat for higher performance compared to Sandy Bridge, so a 35W IVB is going to be somewhat better than a 35W SB CPU.
I picked the Intel Core i3-3220T. This fits about the best in the price / performance / power triangle for me, and still offers 2 cores with HT, 2.8 GHz clock speed, Intel’s not-half-bad integrated graphics and some nice power saving features.
Power Supply
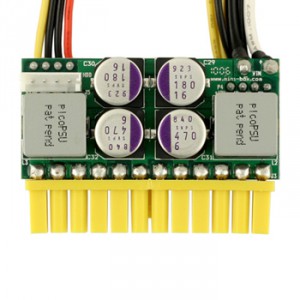 As I mentioned previously, the case I’m using doesn’t have room for an ATX power supply, so a DC-DC power supply it has to be. There are many different types of these, but by far the best in my experience are the Mini-Box picoPSU series.
The closest I could get to Intel’s recommended minimum power supply specification is the Mini-Box picoPSU-160-XT (160W) combined with a 192W 12V DC brick. The picoPSU takes the +12V from the power brick and converts it into all the required ATX voltages and is itself only the size of an over-size 24-pin ATX connector. Impressive.
It ships with a 4-pin ATX12V connector (not the 8-pin EPS12V) and a peripheral cable with a SATA power connector and a Molex power connector (the sort used on 5.25″ DVD drives, etc..). You can purchase an additional peripheral cable to give you 2x SATA power and 2x Molex if you need it.
It turns out the whole HTPC uses 25W peak power, so this was more than likely grossly over-specified. I’d still recommend you go for the bigger PSU to overcome those short spikes in power usage that could crash your HTPC if there wasn’t enough power.
Case / Enclosure
I’m using a Jetway JC-110-B, because the price was right. It’s not the prettiest thing in the world, but it’s about the right size and does the job nicely. It also happens to come with a 60W DC power supply including a brick, which I put to good use elsewhere. I’m sure you can find a nicer case than this now, but I couldn’t at the time for sensible money.
To fit everything in this case you have to remove one of the fans, as the picoPSU butts up against it and doesn’t fit properly, and even then it’s a squeeze. It all fits fine, and one fan is plenty to get the air moving even on very slow speeds. You also have to drill the front plate for the IR receiver module (below), unless you want to use an external USB one.
Storage
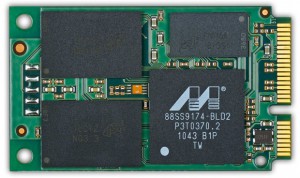 Once upon a time, my HTPC booted off iSCSI from my home server where all my media is kept, but this became a bit of a pain to maintain. Now that SSDs are so cheap, I got a Crucial m4 64GB mSATA SSD. Even 32GB is more than enough to run the HTPC (all media is stored elsewhere on the server) but the 64GB one is faster and at that price, who can argue?
IR receiver
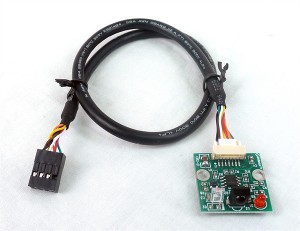 What use is an HTPC if you have control it with a keyboard and mouse? One of the nice things Microsoft did is push the whole Media Centre thing, and even standardised (to an extent) IR remote controls to control PCs. You can either use a USB dongle for this, or the built-in header with an IR board. You then pair that with a Windows MCE remote and that’s it. The advantage of using the internal header is you can power on the box with the remote, which sadly seems impossible via USB.
I have some generic MCE remote and the Inteset “Intel CIR Receiver” module. Does exactly what it says on the tin. To get it to power up from the remote, you have to install Windows and the CIR drivers once, which programs the motherboard firmware to wake up the board when you push the power button on the MCE remote. You can junk the Windows installation completely once you’ve done this. I did it on a temporary SATA hard disk that’s now back in my parts bin.
HDMI CEC module
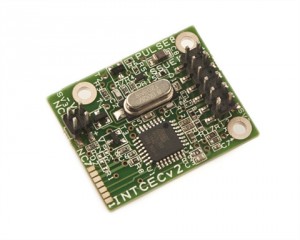 CEC, or Consumer Electronics Control, is a standard part of HDMI that means you can control all your gear with a single remote. It’s called all sorts of different names like Viera Link, Bravia Link, but it’s all exactly the same thing – they even all work together.
Well guess what? You can do CEC with XBMC thanks to Pulse Eight, who offer an Internal HDMI-CEC Adapter that works with the DH77DF, or an external USB-CEC Adapter if you go for something else. These guys work on the open source libCEC and contribute to the XBMC project, so I think you should get one of these even if, like me, your TV is too old to speak CEC. Oops.
Sundries (memory, dvd)
I got 8GB of memory because it was so cheap it was silly not to. You can easily get away with 2GB if you’re really tight, though. I nearly always get my memory direct from Crucial, they have never let me down.
Conclusion
So there you have it, all the hardware that makes up my HTPC. I’ll try to write up how to install and set up the software I have running on mine “soon” (e.g. in a few months if I get round to it), but to summarise it runs Debian Wheezy (not Ubuntu) with XBMC from deb-multimedia. This has full IR remote control and CEC support, and plays DVDs and HD content without the slightest hiccup, even with deinterlacing enabled. All of this leads to very high levels of WAF (tried and tested), and thus comes highly recommended.

I like this setup and am planning the same type of build to replace an Atom/ION setup. The old machine doesn’t do Netflix HD in W7. It stutters like crazy. Similar results with YouTube HD.
Are you running Windows 7 and can you stream Netflix HD with out hestitation?
Thank you.
No, sorry, I run XBMC under Linux. But certainly under Linux I can play HD content without the slightest issue, so I don’t see why it wouldn’t be the same in Windows.